Archive for the ‘Technology’ Category

New computer!

Monday, October 15th, 2012

Well, I picked up a new Thinkpad X200 Tablet. While it’s not the latest and greatest Thinkpad tablet, it’s my first computer other than an eeePC that has a solid state drive (SSD).

So how’s the SSD?  Fast.   That is all.

More later on the Ubuntu 12.04 installation process…

Xournal: Want to number pages in a journal file?

Thursday, March 31st, 2011

Want to number pages in your Xournal journal files?  If you’re using Xournal on a typical Linux distribution, you can try these Python scripts, which add or remove page numbers from the journal file itself.

They’re somewhat crude, so use them at your own risk.  They create a new file rather than overwriting the old one, so the risk in using these should be minimal.

They have gotten the job done for me for at least a  year now.

xoj_numbering_scripts.tar

Any problems or suggested improvements?  Let me know!

On the Kindle

Wednesday, March 9th, 2011

I’ve had a Kindle for about 6 months now.  It’s a nice device, but it’s quite annoying that I can have new hardcover books shipped to me for 2/3 of the price of the Kindle edition.  Why should the Kindle book – which costs nothing to print, and nearly nothing to store and ship – cost 33% more than a full-size hardcover book?  (This ignores the much lower cost of the paperback – which is the edition most comparable to a Kindle edition, anyhow.)

Were the Kindle books a little more price competitive, I’d have probably bought about five times as many Kindle books as I have now.

More on the X61 Tablet: Calibrating the touchscreen

Friday, January 14th, 2011

I’ve updated my tablet script for Ubuntu 10.04 to fix the calibration of the multitouch touchscreen on my X61 tablet.  (Oddly, the stylus and the finger touch seem to be completely different devices with their own calibration).  Here it is:

#!/bin/bash
# Remap the side button to bring up context menu.
xsetwacom set "Serial Wacom Tablet" Button1 "button 1"
xsetwacom set "Serial Wacom Tablet" Button2 "button 3"
# Fix the "Serial Wacom Tablet eraser" button to paste
xsetwacom set "Serial Wacom Tablet eraser" Button1 "button 2"
# Calibrate the touchscreen on multitouch X61
xsetwacom --set 'Serial Wacom Tablet touch' 'TopX' '40'
xsetwacom --set 'Serial Wacom Tablet touch' 'TopY' '86'
xsetwacom --set 'Serial Wacom Tablet touch' 'BottomX' '940'
xsetwacom --set 'Serial Wacom Tablet touch' 'BottomY' '948'
# Done

I run this script as a task when my Gnome session starts (System/Preferences/Startup Applications) and I added it to the beginning of /etc/gdm/Init/Default so that I could use the touchscreen to log in.  Since the Gnome on-screen keyboard for the login screen is too small for finger touch, I also edited /usr/share/gdm/autostart/LoginWindow/onboard.desktop to make the onscreen keyboard bigger:

Exec=onboard --size 1022x190 -x 0 -y 0

Now I can log in without the stylus!

You can get the numbers for touchscreen calibration by running:

xinput test 'Serial Wacom Tablet touch'

I did have to tweak the numbers that xinput spit out to get the best overall touchscreen response – just putting the numbers xinput showed for TopX and BottomX resulted in touch being a bit off on the right hand side of the screen.

Source: http://www.ormiret.com/?q=node/26

The chemist and the Lynx – Part 2

Friday, May 28th, 2010

I’d indented to post this a bit earlier, but I’ve been scrambling lately to recover from the premature death of both my Thinkpad X61’s AC adapter and its 320 GB Hitachi hard drive.

When it rains, it pours.

Now I’m back online with a spare drive and another fresh Ubuntu 10.04 installation.  So now it’s time to get some more stuff working nicely.

Stylus buttons

Wouldn’t it be nice to have the thumb button on the stylus bring up a menu?  That way, you could use only the stylus to navigate the desktop without having to flip it over.  Ubuntu 10.04, unfortunately, does not provide any tool to change the functions of the stylus buttons.  But that doesn’t mean it can’t be done with a script:

#!/bin/bash
# Remap the side button to bring up context menu.
xsetwacom set "Serial Wacom Tablet" Button1 "button 1"
xsetwacom set "Serial Wacom Tablet" Button2 "button 3"
# Fix the "Serial Wacom Tablet eraser" button to paste
xsetwacom set "Serial Wacom Tablet eraser" Button1 "button 2"

If you save the script above (I saved it as stylusbuttons.sh), you can tell it to be run every time you log in to your desktop using the main menu option System->Preferences->Startup Applications.

Screen rotation

Sometimes it’s nice to use the X61 as a proper tablet – with the screen folded down and the desktop rotated.  Rotating the desktop is simple enough, but the stylus doesn’t rotate with the desktop – making the rotated desktop impossible to use.  This is something I wish Ubuntu would handle automatically, but it’s also something that can be done easily with a script:

#!/bin/bash
# Won't work if the display is something other than 1024x768
# Won't rotate if external monitor is connected
orientation=`xrandr -q | grep -c 1024x768`
if [ $orientation -eq 2 ]; then
   /usr/bin/X11/xrandr --orientation right
   xsetwacom set "Serial Wacom Tablet" Rotate CW
   xsetwacom set "Serial Wacom Tablet eraser" Rotate CW
else
   /usr/bin/X11/xrandr --orientation normal
   xsetwacom set "Serial Wacom Tablet" Rotate NONE
   xsetwacom set "Serial Wacom Tablet eraser" Rotate NONE
fi

Save this as rotation.sh .  It will rotate the desktop and the stylus, leaving you with a usable system.  If you run the same script again while the desktop is rotated, it will restore the desktop and stylus to their original orientation.  If you don’t want to open the terminal window to rotate your desktop, you can use an application launcher in the Gnome panel to run the script.

Fixing the screen saver

In Ubuntu 10.04, the screensaver locks the screen by default, requiring you to enter a password to unlock the screen.  This can be rather annoying on a rotated tablet, since the screen saver does not provide an on-screen keyboard to allow you to unlock the screen.  With so many mobile devices about, you’d think this issue would have been fixed by now, but so far it’s not been done.  It’s not that the screen saver doesn’t support an on-screen keyboard; it’s just that there is no obvious way to turn it on!

Here’s what you need to do:

Install cellwriter, which you have probably already done.  If not,

apt-get install cellwriter

Then, open up gconf-editor.

gconf-editor

Open the apps folder, then click gnome-screensaver.  Make sure the box beside embedded_keyboard_enabled is checked.  Then, click embedded_keyboard_command and set its value to this:

cellwriter --xid --keyboard-only

Now you can unlock the screen with your stylus!  (And you can also curse the Gnome developers for only half-fixing a major and easily-fixable accessibility problem.)

The chemist and the Lynx – Part 1

Wednesday, May 12th, 2010

Longtime readers (all three of you) might have noticed that I run Ubuntu Linux on my computers.  There’s a new Ubuntu out – version 10.04 “Lucid Lynx”.  Now that my school is between semesters, I have a little time to get the new version up and running (and troubleshooted) before summer classes start.

Installation on a Thinkpad X61 Tablet

You don’t have to do it this way, but I usually back up my personal data and do a fresh install of a new operating system.  I chose the 32-bit version of Ubuntu because 64-bit Flash is still a work-in-progress at this point.  Plus, I use a few older 32-bit Windows applications under Wine for teaching, and they’re just easier to get running reliably with a 32-bit install.

As is typical with most recent Ubuntu releases, the initial install was painless.  Boot up with the CD and answer the questions.  That’s it.  All the X61 Tablet hardware that I actually use – including the pen – is functioning as soon as the installation is complete.

Essential software

The first thing you’ll want to do on any new Ubuntu system – and Lucid is no exception – is to install the usual multimedia tools.  At a minimum, you want to install the “restricted” packages:

sudo apt-get install ubuntu-restricted-extras

This will enable playback for most media files, install the freely available Microsoft web fonts, etc.  If you have a tablet like I do, you will also want cellwriter for handwriting recognition and xournal for note-taking and PDF annotation:

sudo apt-get install cellwriter xournal

Let the tweaking begin:  Fixing the new themes

Next, let’s have a look at the new Lucid desktop.  I don’t like dark desktop themes.  Therefore, I consider the default Ubuntu theme – “Ambiance” – to be an abomination.  Luckily, there’s a light version of the default theme, called “Radiance”.

Both of these new desktop themes could use some improvement.  One issue that bothered me immediately relates to active windows.  In most themes, the window that you are currently using – the “active” window – is distinguished from other visible windows by giving the title bar of the window a distinct appearance.

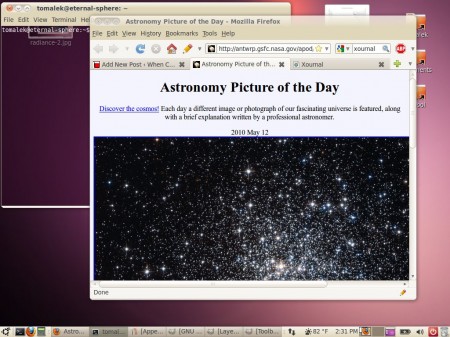
Here’s the default Radiance theme.

The Radiance theme, as shipped with Ubuntu Lucid 10.04

In the picture above, the terminal window (and not Firefox) is the active window, and will receive input from whatever keys you happen to press.  You can see that in an active window, the close button is orange.  You can also see that the active window is dark gray in the task bar.  These are small cues, though, and are not very useful when a lot of windows are open.

This is more minor, but the scrollbars on the Firefox window are also hard to see.

And then there’s the buttons. The window buttons (minimize, maximize, and close) have been moved to the left side … for what appears to be no good reason at all.  This might be great news for someone who is left-handed, but not for me.

I’m not a themes guru. but these details bothered me enough to hack the Radiance theme to make it more usable.  First, I borrowed some elements from the dark Ambiance theme and modified Radiance so that inactive windows would have a dark title bar and buttons, while the active window would be light.

I changed the scrollbars to match the orange-ish window close button, which makes them much easier to see and grab with the pen.

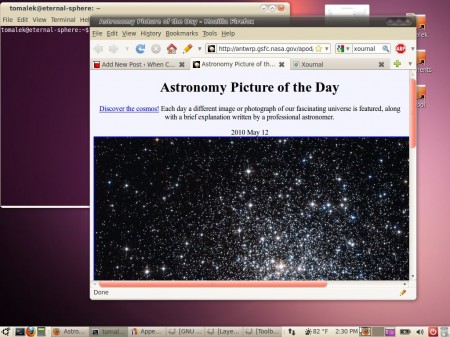
And the buttons?  Back where they belong.  The result looks like this.

Modified Radiance theme

(The active window in this screen shot is still the terminal window.)  As you can see, active and inactive windows now look different from one another.  No more confusion when transferring grades from my spreadsheet to our web-based system!

Want these modifications for your desktop? Download it here: [Modified Radiance theme – TAR archive]

To install this theme, download it, then extract the contents of the archive into /usr/share/themes.  The commands below should work on a default Lucid install

cd /usr/share/themes
sudo tar xf /home/[your user name here]/Downloads/radiance_2_3.tar

Then, select the “Radiance-2” theme from your System/Preferences/Appearance menu.

In Part 2, I’ll discuss making the stylus buttons do more interesting things

This seems appropriate

Wednesday, April 21st, 2010

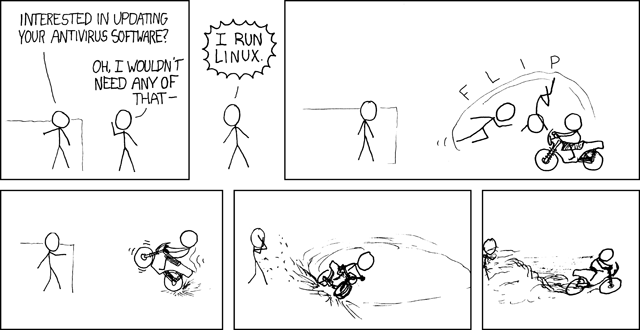
As I watch our school’s computer network crash and burn because McAfee couldn’t be bothered to test their software before rolling out an update, I feel thankful that my laptop – where all of my teaching materials are kept – runs Ubuntu.

xkcd sums up my feelings on the whole matter rather nicely:

The Tablet and the Jackalope

Thursday, June 18th, 2009

Yesterday, I did something that I’ve never done before – a mid-semester major distribution upgrade.  I have a Thinkpad X61 Tablet which I use for teaching, and that tablet runs Ubuntu Linux.  I’ve also set Patty up with a Thinkpad X41 tablet to replace her ancient Thinkpad X31

So how did it go?

Thinkpad X41 Tablet

Ubuntu has been broken by default on tablet PCs for some time.  By “broken”, I mean that after an installation, the tablet stylus doesn’t work.  If you know what you’re doing, it’s not too difficult to make it work, but it’s still a headache that shouldn’t exist.

With the latest Ubuntu (Jaunty Jackalope), the tablet pen functions without any additional configuration.  In fact, essentially all of the X41’s most important hardware is configured on installation.  But there are a few exceptions, and here they are!

Fingerprint reader

The fingerprint reader is not set up automatically.  Since I don’t use the reader, I didn’t feel that manually setting up the fingerprint reader was a deal-breaker.

Tablet keys

The tablet keys (underneath the display) are not configured by default.  This one is a bigger deal, since you’ll need those keys to use the tablet as, well, a tablet.  After is bit of googling, here’s the fix to get the X41 tablet keys going.

Essentially, make a script that contains this:


#!/bin/sh -e
setkeycodes 6e 109
setkeycodes 6d 104
setkeycodes 69 28
setkeycodes 6b 1
setkeycodes 68 130
setkeycodes 6c 131
setkeycodes 67 132

… and save it as (or add it to) /etc/rc.local

This script is executed every time you boot up.  It assigns the correct keycodes to the tablet keys.  (This is something you didn’t have to do in previous Ubuntu releases.)

Rotation

To use the tablet as intended, you probably want to rotate the display.  As with all previous incarnations of Ubuntu, this is not set up for you after the installation.  You’ll find various scripts on the internet for rotating the screen and stylus, but most of them won’t work on Ubuntu Jaunty Jackalope because of … the way the tablet pen is automatically configured.  So, the pen is now set up for you, but it’s set up in such a way as to make changing its behavior (which you’ll need to do to rotate the screen) more difficult.

Here’s a simple rotation script thta works with Ubuntu Jaunty Jackalope on the X41 tablet and X61 tablet, provided you have the 1024×768 screen.  If you have a larger screen, you’ll need to modify the script accordingly.  Save it as /usr/local/bin/rotation.sh


#!/bin/bash
orientation=`xrandr -q | grep -c 1024x768`
echo $orientation
if [ $orientation -eq 2 ]; then
/usr/bin/X11/xrandr --orientation right
xsetwacom set "Wacom Serial Tablet PC Pen Tablet/Digitizer" Rotate 1
xsetwacom set "Wacom Serial Tablet PC Pen Tablet/Digitizer eraser" Rotate 1
xsetwacom set "Wacom Serial Tablet PC Pen Tablet/Digitizer" xyDefault
xsetwacom set "Wacom Serial Tablet PC Pen Tablet/Digitizer eraser" xyDefault
else
/usr/bin/X11/xrandr --orientation normal
xsetwacom set "Wacom Serial Tablet PC Pen Tablet/Digitizer" Rotate 0
xsetwacom set "Wacom Serial Tablet PC Pen Tablet/Digitizer eraser" Rotate 0
xsetwacom set "Wacom Serial Tablet PC Pen Tablet/Digitizer" xyDefault
xsetwacom set "Wacom Serial Tablet PC Pen Tablet/Digitizer eraser" xyDefault
fi

Execute the script, and the screen and stylus will be rotated. Execute it again, and the screen and stylus will return to their normal orientation. This is good to assign to the “rotate” button underneath the screen, but you can execute the script from a terminal as well.

Thinkpad X61 Tablet

Setting up Ubuntu Jaunty Jackalope on the X61 tablet is fairly similar to setting it up on the X41 tablet.  As before, much of the important stuff is automatically set up by the installation.  However, the X61 tablet has a few more quirks than the X41 does.  Here they are!

Fingerprint reader

Same as the X41 tablet.

Tablet keys

By default, the directional keys, enter, and the escape button work as expected.  The other keys will require a similar script to the X41 9above).  I haven’t messed with figuring out the keycodes for the X61 tablet yet, though.

Rotation

Same as the X41 tablet.

Desktop effects

On the X41 tablet, these “just work”.  On the X61 tablet, they will “just work” when a certain set up updates is made official in Ubuntu Jaunty Jackalope.  But as of 6/17/09, you’ll need to enable the “proposed” repository (which contains the newest updates that haven’t gone through as much quality control as what you’d get through the normal update channel). 

Here’s how to enable the proposed repository.  You need the latest compiz and xserver-xorg-video-intel packages to get desktop effects working.

Or, you can wait until the compiz and xserver-xorg-video-intel updates become official.

Improving video performance

The X61 tablet (and the X41 tablet, too) have Intel video cards.  The Intel video driver for Linux is currently in the middle of a redesign.  That’s bad for laptop users, because it makes video performance in recent releases of Ubuntu quite horrible.  The X41 tablet is affected somewhat, but the X61 tablet suffers terribly from the reduced performance.

The real fix for the video problems won’t come until the next release of Ubuntu, but you’ll likely want to be able to use your computer properly before then.  Here’s what you need to do:  Follow this HOWTO from the Ubuntu forums.  I used the “optimal” procedure, and am getting better video performance without any crashes so far.

(This procedure will also work for the X41 tablet, but with a more modest performance gain.)

Changing the pen’s behavior

The X61’s stylus features an eraser tip, a side button, and a pen tip.  I wanted the side button to bring up context menus and the eraser to paste (when not being used by an application like xournal).  So, I made a little script to change the behavior of the buttons.


#!/bin/bash
xsetwacom set "Wacom Serial Tablet PC Pen Tablet/Digitizer" Button1 "button 1"
xsetwacom set "Wacom Serial Tablet PC Pen Tablet/Digitizer" Button2 "button 3"
xsetwacom set "Wacom Serial Tablet PC Pen Tablet/Digitizer eraser" Button1 "button 2"

I saved this as /usr/local/bin/stylusbuttons.sh, which i have set to run when I log in. Now the stylus buttons work the way I want.

I’ve managed to get though a day of teaching wit hthe new install without incedent.  So far, so good!  Anything to add?  Improvements to the stuff above?  Configuration questions?  I’m all ears!

You can’t fight dumb with more dumb

Wednesday, December 10th, 2008

I’m something of a Linux advocate.  I use Linux in my everyday work as an educator, and the only machine in my house that runs a Microsoft OS is the Xbox 360.  So I found this mess linked by both Slashdot and Linux Today somewhat interesting.

If the linked blog post is accurate, a Texas middle school teacher confiscated a boy’s Linux discs because she believed that distributing the discs was illegal.  That’s definitely ignorance on the teacher’s part.  A typical Linux distribution can be freely distributed, and distribution maintainers typically encourage this sort of thing.  That a Texas middle school teacher is not aware of this isn’t really surprising.  And the teacher’s response to Linux distributions is quite silly:

No software is free and spreading that misconception is harmful. […] I along with many others tried Linux during college and I assure you, the claims you make are grossly over-stated and hinge on falsehoods.

After all, all that’s missing from here is “…I didn’t inhale.”***  Clearly, this teacher is in need of some education on what free software is.  She’s clueless.  But the response by the blogger who’s causing all the fuss is just as dumb.

Then again, being a good NEA member, you would spout the Union line. Microsoft has pumped tens of millions of dollars into your union. Of course you are going to “recommend” Microsoft Windows”. To do otherwise would probably get you reprimanded at the least and fired at the worst.

Keep in mind that this is happening in Texas, where teachers are prohibited by law from collective bargaining (or striking).  Texas just isn’t a union shop, and it’s entirely possible that this middle school teacher doesn’t even belong to a union.  And if she did, it’s unlikely to be one that could get her “reprimanded or fired” for using Linux.

Sheesh.  You can’t fight dumb with more dumb.


*** The “I tried Linux in college” quote is the reason I still think the whole thing is satire, and should be posted on The Onion.

OpenOffice.org 2.4.0

Friday, March 28th, 2008

OpenOffice.org recently released the 2.4.0 version of its free office software. I’m a Linux user, so I’ve used OpenOffice for years on my own machines.

There’s a Windows version, but I’ve always been hesitant about replacing Excel on our lab machines with OpenOffice Calc. Why the hesitation? Excel had one feature that OpenOffice Calc did not. A small feature, but one that saved my students a lot of time.

We don’t have anything in our lab that requires Excel, and our students usually use Excel for simple plotting of calibration curves. Excel could do simple regression analysis on the data and with one or two additional clicks, print a chart that included the regression line and its equation.

OpenOffice.org could print a chart that included a regression line, too. The problem was the equation. To get the equation of the regression line, you had to redo the regression somewhere else in the spreadsheet. If you wanted the equation of the line displayed on the chart, you had to manually type the equation onto the chart as a subtitle. This added a lot of extra steps to what should have been a simple one-click process. I teach chemistry, not computers. Wrestling with software to get it to do something that should be simple is a waste of my time.

That’s finally changed with OpenOffice 2.4.0. it’s now easy to display the equation on a chart, as you can see below.

[Regression line AND equation: OpenOffice 2.4.0]

… so now I should be able to use OpenOffice in my student labs. And if you haven’t looked at OpenOffice for data workup in student labs, check it out. It’s one less piece of software for your school and your students to buy.