Archive for the ‘Science’ Category

The many phases of iodine

Monday, September 11th, 2006

Iodine is a rather neat element. It’s a nice – if a little boring looking – crystalline solid at room temperature. Chunks of iodine are similar in appearance to things you might find in the bins of rocks at places like Black Market Minerals at Barefoot Landing.

[Solid iodine]
Solid iodine

Iodine is interesting because it is easy to make solid iodine go into the gas state. Plus, unlike many gases, iodine vapor has a distinct purple color and is easy to see. Solid iodine slowly sublimes (goes from the solid state to the vapor) at room temperature. It’s easy to accelerate this process by supplying a little heat.

If the iodine vapor comes into contact with a cool surface, it will deposit (resolidify) on the surface, forming pretty crystals. (A similar thing happens when water vapor comes into contact with a cool surface, although in that case you usually get liquid water.)

To show this, I tried to replicate a picture of a demonstration from one of my older chemistry books. I took some solid iodine and put it into a beaker, then set the beaker on a hotplate. On top of the beaker, I put a watch glass (curved piece of glass that looks something like a lens) and some ice – to provide a nice, cool surface.

[Setup]
Setup

To speed up the production of iodine vapor, I turned on the heat (just a little). You can just barely make out the purple iodine vapor in the beaker.

[A little iodine vapor]
A little vapor is visible

If the hotplate’s temerature gets to about 114 oC (about 237 oF), the iodine will begin to melt, forming a dark purple liquid. The amount of iodine in the vapor state goes up, too!

[More iodine vapor]
More vapor is visible. If you value your nose, keep it away from this vapor.

What’s impressive about this demonstration is the sheer number of phase changes that are going on at once.

[Phases galore!]
Pick a phase, any phase!

At the bottom of the beaker, you have some solid and liquid iodine. Since the hotplate is providing heat energy, you have the solid iodine melting and subliming. The liquid iodine is also evaporating. Near the top of the beaker (and to some extent on the sides of the beaker – which are cooler than the bottom), you have deposition of iodine vapor, forming solid iodine crystals. (It also looks like some iodine may have condensed on the hotter parts of the beaker nearer the bottom, then frozen after the beaker was removed from the hotplate.) That about covers it!

… not counting the ice, that is. The ice at the top of the beaker is melting, removing energy from the iodine vapor as it deposits on the bottom of the cold watch glass.

[Deposited crystals]
Deposited iodine crystals, forming from purple iodine vapor

The crystals formed on the watch glass are flat and shiny – almost metallic in appearance. They’ve grown to look a bit like perverted stalactites.

[Deposited crystals, closer view]
Deposited iodine crystals, closer view

A few words of caution if you attempt this experiment yourself. Iodine may look harmless (it won’t blow up on you – provided you keep it away from combustibles), but iodine solid can cause chemical burns on skin contact, and iodine vapors are very bad for the lungs. This sort of experiment needs a fume hood, and solid iodine shouldn’t be handled directly.

Chemistry you can do at home: The color of money

Wednesday, June 21st, 2006

A brass is an alloy (or solution) of copper and zinc metals. Brasses have been known for a long time, and have a pleasing color – somewhat like metallic gold.

Regular pennies are made of copper metal – sometimes. Pennies made in or after 1983 aren’t entirely copper, since copper got too valuable to throw away by just making pennies with it. New pennies are actually made of zinc, with a thin copper coating (so they still look like copper pennies). This gives the pennies some rather neat chemical properties, which I’m going to post about in a few posts here on the blog.

If new pennies are made of zinc with a thin copper coating and brasses are mixtures of copper and zinc, why can’t we turn a penny into brass and give it a cool-looking "gold" finish? Well … we can. It’s quite easy to do with a new penny. (It’s even possible with an old copper penny – but you have to add the zinc yourself.)

Since a brass is a mixture of copper and zinc, we have to get the atoms of copper to mingle with the atoms of zinc. To do that, we need to get them moving. While atoms are essentially always moving, in the solid state they don’t move very much – so simply having the copper in contact with zinc is not enough to make a brass – at least not in a reasonable timeframe. (If it were that easy, then your pennies would be brass already!) We need to stir things up a bit at the atomic level, and that means we need to apply heat.

We could apply enough heat to simply melt the zinc and copper and let them mix to form a brass, but that wouldn’t be very fun. After all, we want a brass penny – not a lump of brass. So we don’t melt the penny – we heat it up gently so that the brass forms without melting the penny.

To get a nice shiny brass penny, you need to start with a nice shiny (post-1983) copper penny. Clean the penny with some steel wool, available at just about any store that sells household supplies. Buff the penny with the steel wool until it’s bright and shiny. Try to avoid buffing too hard, since you don’t want to remove the copper or scratch the penny badly.

Even if the penny is new and appears clean, buff it a little. You’re more likely to get a nice, evenly colored brassy penny that way.

Now, you’ll need a heat source, preferably one that can reach at least 200oC – same thing as 392oF. I used a hotplate with adjustable temperature settings for the pictures in this post, but you can also use a toaster oven. (A stovetop or grill could work, but it would probably be too difficult to control the temperature. Don’t even think about attempting this in a microwave oven.)

If you set your heat source to about 400oF, it will take approximately 25 to 30 minutes for your penny to become brassy. A temperature of 250oC (482oF) makes the process takes less time, but seems to produce poorer-looking results. If you’re using a small toaster oven like the one I have at my house, you might have to bump the setting to 425oF to get good results. You may also have to wait a little longer than 30 minutes. You will probably have to experiment a bit with temperature and time, but at least the raw materials are cheap!

[Hotplate at 250]

Want to see what will happen? The pictures below were taken at the 250oC temperature. The penny goes through the same color transformations at lower temperature – only more slowly.

At two minutes, you can see the penny beginning to change color and darken.

[Penny at 2 minutes]
Two minutes at 250oC

Another minute in, the penny takes on a silvery tint.

[Penny at 3 minutes]
Three minutes at 250oC

After five minutes, the penny gets a distinctive brass color.

[Penny at 5 minutes]
Five minutes at 250oC

The finished product, removed from the hotplate and cooled after about six minutes of heating. Be very careful with hot metal! It can give you a nasty burn!

[Final result]
Brass penny

Instead of a simple copper coating, the penny is now sheathed in brass. It looks a little like gold, but trying to pass off heat-treated pennies as rare gold coins is not advised!

Chemistry you can do at home: Coke fountains

Wednesday, June 7th, 2006

Cola drinks, as almost everyone knows, contain dissolved gas. The gas is present in two forms in the drink: dissolved CO2 molecules, and carbonic acid (H2CO3) – which forms in a reversible reaction between the carbon dioxide and water.

Dissolved CO2 is partially responsible for the flavor of colas, and is completely responsible for the fizz. The fizz is what we’re interested in for this blog post. Like all gases, carbon dioxide takes up a lot of space relative to its mass. When dissolved in liquid, it takes up less space than it would in the gas form. What if all the dissolved carbon dioxide in a bottle of cola were to come out of the liquid at once? The gaseous carbon dioxide would push against the liquid and the sides of the bottle. if there was a path for the liquid and gas to escape, they would shoot out rather rapidly.

You can get some dissolved carbon dioxide to come out of a cola by shaking it (who hasn’t seen this at least once?). This is good for practical jokes, but doesn’t make for an impressive fountain. For that, we need something better: Mentos mints.

While I’m not sure of the mechanism (I have a few ideas), Mentos mints catalyze the release of carbon dioxide from colas. Catalysts speed up a process, and Mentos mints make the carbon dioxide come out of cola fast. Really fast. Fast enough to blow three quarters of the liquid out of a two liter cola bottle.

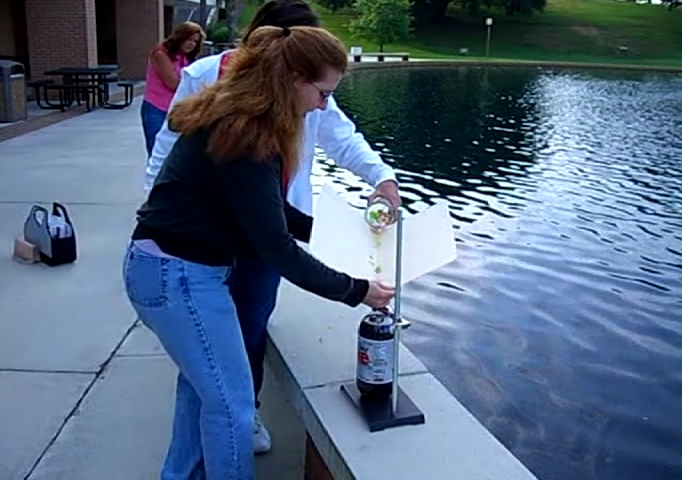
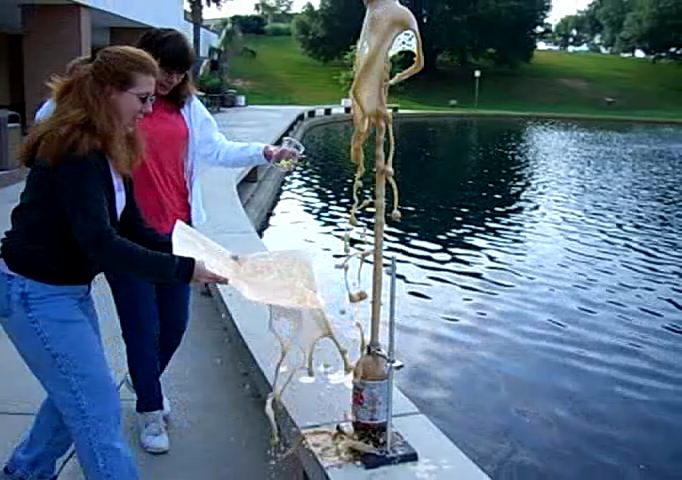
We tried putting some Mentos into a two liter bottle of Diet Coke in my introductory chemistry class – it’s a good demonstration of the effects of gas pressure. Here are the results.

Click each image to enlarge.


Loading the Mentos. I had the students use the folder as a chute to get the Mentos into the bottle because that way it would be less likely for the students to put their head directly over the bottle. (See? I’m not completely evil!)


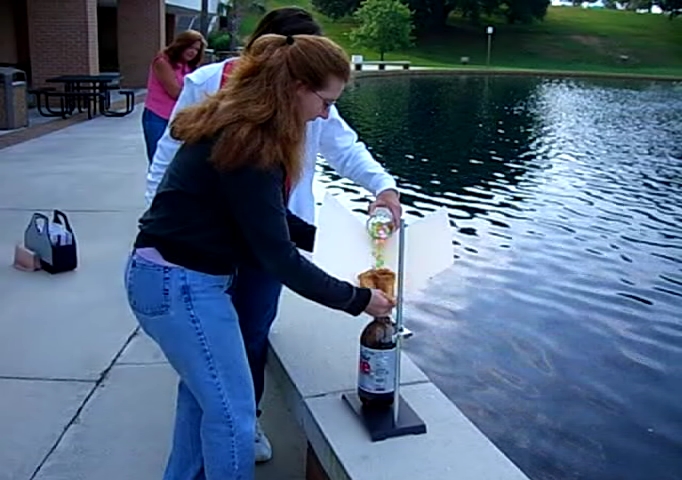
You can see the cola already starting to shoot out of the bottle. My students haven’t yet noticed, since this is only a few seconds after the first few Mentos make it into the bottle.


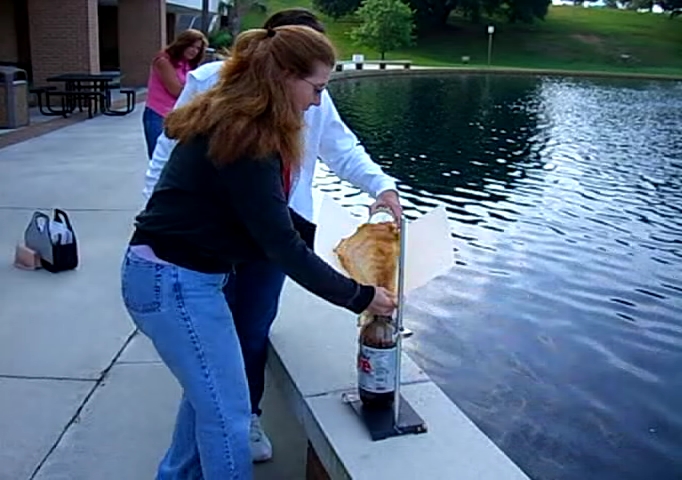
Have they noticed yet?


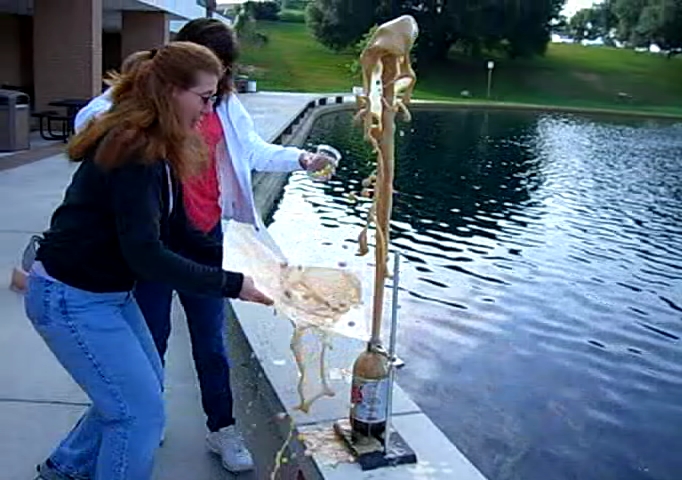
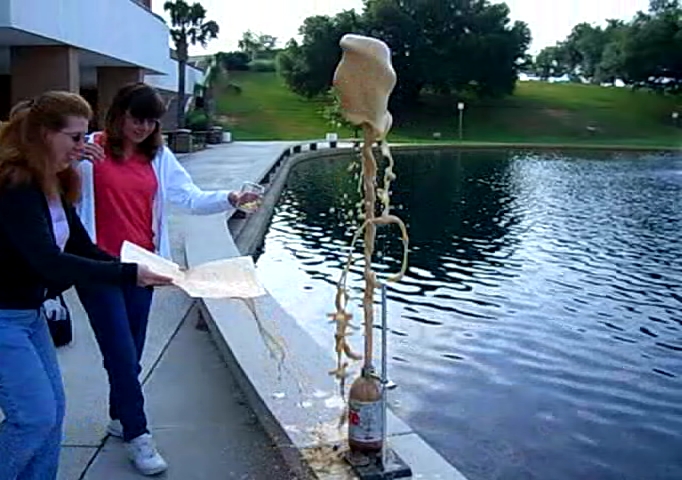
Thar she blows!


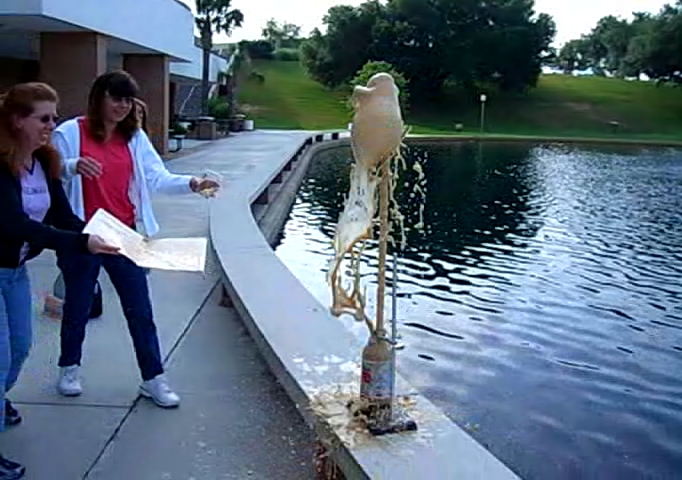
Behold! The mighty Coke fountain!

We estimate that cola shot up about four feet over the top of the bottle. This is similar to other results from around the web.


Is that the face of Jesus in the cola? Or is it something more sinister? (This experiment was performed on 06/06/06, after all!


Who’s going to clean this up, anyway?

I think I’ll try this again with my other classes. It’s cheap, safe, entertaining, and requires no special hardware. Just don’t do it inside!

Old School Chemistry – The Analysis of Native Gold

Friday, May 26th, 2006

I have a small (but growing) collection of chemistry books from the 1800s and early 1900s. If you’re a student of chemistry, it’s nice to have an idea of the science’s roots. These old books help to show how the science has matured over the years.

J.L Comstock’s Elements of Chemistry textbook (1851 edition, pages 388-389) provides us with a method for analyzing the composition of native gold – that is, gold as you might find it in the ground. If you’re very, very lucky. (I’d wager that finding native gold was a lot easier in 1851 than in 2006!)

ANALYSIS OF NATIVE GOLD

Native gold, or gold as it occurs in its natural state, is usually alloyed with various proportions of metallic silver and copper. The proportions of each are found by the following method:

Process 1 – Digest a given quantity of the metal, say 100 grains, with so much nitro-muriatic acid as to dissolve the whole. During the process, a white flocculent precipitate will fall to the bottom of the vessel, which is the silver in the form of a chloride of that metal. The clear liquid must be decanted, leaving this to be collected, washed, and dried on a filter, and then weighed. The proportion of pure silver may be estimated at three quarters the weight of the chloride.

100 grains is about six and a half grams. That’s about $120 worth, at the time I typed this. (That is why I’m not going to be able to do this particular bit of chemistry in our lab. 🙂 )

Comstock refers to nitro-muriatic acid, which is a mixture of nitric and hydrochloric (muriatic) acids. This mixture is also referred to as aqua regia, and is one of the few solvent mixtures that will dissolve metallic gold.

The chloride of silver produced is commonly known as silver chloride (AgCl), which is indeed three quarters silver by mass. My intro and freshman chemistry students should be able to verify that percentage with no difficulty.


(107.87 g Ag) / (143.12 g AgCl) * 100% = 75.35% Ag

Back to Comstock …

Process 2 – The remaining solution to which the washings of the precipitated silver was added, contains the solutions of gold and copper. On adding a solution of the proto-sulphate of iron, the gold will be precipitated, when the clear liquid must be decanted, and the precipitate washed and dried, and afterwards reduced to the metallic state, by fusion with poitash and borax, as above directed.

We certainly don’t want to throw away the gold, so Comstock advises us to precipitate the gold out of solution using “the proto-sulphate of iron”, known today as iron(II) sulfate (FeSO4). I suspect that the iron(II) reduces the gold ions to metallic gold, forming a precipitate of gold and leaving iron(III) behind in solution.

3Fe2+(aq) + Au3+(aq) --> 3Fe3+(aq) + Au(s)

Comstock then has us mix the gold with potash (potassium hydroxide) and borax (sodium borate), then heat in a silver crucible. I’m not entirely certain how this one works, having never had the opportunity to try it.

Process 3 – The liquor now remaining contains the copper and the little iron which was added for the separation of the gold. Of the iron, no account is to be taken, but the copper is to be precipitated by inserting in the liquor clean plates of iron, and heating the solution, when the plates will be covered with metallic copper, the weight of which may be ascertained by first weighing the plates, and then finding out how much they have gained. If any of the copper falls to the bottom of the vessel, this must, after washing and drying, be added to that on the plates.

The weight of each metal thus obtained, will, of course, show the proportions in the mass.

To get the copper out of solution, Constock relies on good old iron. Iron, being a more active metal than copper, will replace copper in solution, causing the copper metal to fall out of solution and coat the iron plates. Freshman chemistry and high school students will be familiar with this kind of reaction too – a single replacement reaction, which might go something like this.

Fe(s) + Cu2+(aq) --> Fe2+(aq) + Cu(s)

Here’s what that might look like, using an iron nail in a solution containing copper ion.

Before heating
[Iron nail in copper solution, before heating]
Copper(II) ion in solution gives it the blue color you see now. The reaction is slow. You can see a little copper metal coating the nail, but there is still a lot of copper ion left in the solution. This was taken about 15-20 minutes after the nail was dropped into the tube.

There seems to be a problem here, though. Since some of the iron from the plates replaces copper in the solution, the plates contain less iron after the reation than they did before. Merely subtracting the final and initial weight of the iron plates neglects the loss of iron to the solution. Since copper, atom for atom, weighs more than iron does, the plates will always gain mass when put into the solution, but the overall amount of copper reported will always be too low, unless I’m missing something.

Still, a rather interesting (if expensive) analysis, using some fairly simple and clever chemistry for separating the components of native gold.

Aluminum / bromine reaction: lighting fuse not necessary; just get away!

Monday, April 24th, 2006

Let’s say you don’t want to do the thermite reaction, but you still want to see some very neat looking violent chemistry. The reaction between aluminum and bromine might fit the bill.

2Al(s) + 3Br2(l) –> 2AlBr3(s)

It’s a very simple reaction, but it’s also very exothermic, and can put on an impressive show. Not only is enough heat generated to melt the aluminum metal, but the heat also vaporizes some bromine, producing huge clouds of white and orange smoke. For obvious reasons, this reaction should be done where you’ve got very good ventilation. I used my hood for these pictures and this video.

Here’s a still image of the reaction vessel containing only liquid bromine.

[Liquid bromine in a beaker]
Liquid bromine and its vapor.

Bromine is the dark red liquid at the bottom. Bromine is quite volatile, and you can see orange bromine vapor in the top of the beaker.

About ten seconds after adding some torn aluminum foil, things look more like this.

[Aluminum bromide reaction]
Reaction!

A little later …

[More reaction]
Things begin to heat up! (Click to enlarge)

Oh yeah!

[FIRE!]
Now we’re cooking! (Click to enlarge)

Want to see the video? Here are a few links to a 30-second video file with audio:

The aftermath of the reaction is interesting. Some of the aluminum foil melted and fused with the bottom of the beaker.

[Aluminum burned to a beaker]
Aluminum fused to the beaker

Needless to say, we won’t be using this beaker again.

You can see the aluminum bromide product on the sides of the beaker.

[Aluminum bromide]
Aluminum bromide (white / yellowish solid) on the beaker

The aluminum bromide formed will react with water, causing the release of hydrogen bromide (very nasty to breathe – acidic vapor), so you need to be careful disposing of the product! That reaction is also very exothermic, so touching the product or adding water to it is not recommended. Leave it out long enough, though, and it will absorb water from the air on its own.

Ain’t science neat?

Disclaimer: Do not try this reaction at home. In fact, do not try this reaction at all! You were warned.

Updated with more pictures and video: 04/25/2006

Time to call off the prayer groups

Friday, March 31st, 2006

Looks like it’s time to call off the prayer groups.

In the largest scientific test of its kind, heart surgery patients showed no benefit when strangers prayed for their recovery.

And patients who knew they were being prayed for had a slightly higher rate of complications.

I’ll say one thing for this study – it encourages mental gymnastics. Listen to Harold Koenig, from the Center for Spirituality, Theology and Health at Duke.

Although double-blinded studies of intercessory prayer pique our interest because they might demonstrate the power of faith, they are misdirected on both scientific and Christian understandings of God. If these studies showed something, then God would be part of the mechanical universe and His actions could be predicted. I absolutely believe that intercessory prayer can influence medical outcomes, but I don’t believe that the natural methods of science can prove this.

So people like this believe that this intercessory prayer (praying for other people, as in church prayer lists, etc.) can influence medical outcomes, which are decidedly in the realm of the natural world. However, they do not believe that you can use natural means (i.e. science) to demonstrate this effect of intercessory prayer on the natural world.

Someone please explain the logic here.

Better Living Through Chemistry, version 2.0

Tuesday, March 28th, 2006

I got an e-mail this morning announcing the new “vision” of the American Chemical Society.

It’s “the product of more than a year of study and discussions at all levels of the society“.

It’s …

Improving people’s lives through the transforming power of chemistry

The ACS has apparently discovered DuPont’s 1939 slogan, Better Living … Through Chemistry.

Better sloganeering through the transforming power of a thesaurus?

As our cat Rusty might say, “Meh!”

Water, water everywhere!

Thursday, March 9th, 2006

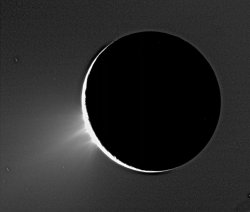
While I wait for some of my night lab students to finish up their calculations, I notice that NASA has released some very interesting information about one of Saturn’s moons – Enceladus. There’s apparently liquid water there, – and it’s near the surface. Apparently, these blue “tiger stripes” are where the liquid water is closest to the surface.

The NASA article says that

Scientists still have many questions. Why is Enceladus so active? Might this activity have been continuous enough over the moon’s history for life to have had a chance to take hold in the moon’s interior?

… which is, of course, going to start endless speculation. But if it raises some interest in the space program, it’s no bad thing.

Some of the water s being shot off into space, and might be responsible for one of Saturn’s rings.

I’m a bit too young to remember any manned moon landings, but I was glued to the television when the images of Neptune came rolling in. The local cable company had stuff from NASA on instead of the channel guide. I guess I’m that big of a science geek!

Ice is nice

Thursday, February 23rd, 2006

Via a post on Panda’s Thumb, here is an New York Times article about the slipperiness of ice.

Water has always fascinated chemists, because it has some rather unusual properties. For one, you would expect that tiny water molecules would exist as gas even at temperatures well below room temperature – since it’s usually true that the larger the molecule is, the higher its boiling point. Also unlike most other substances, water ice floats on top of liquid water. In just about any other substance, the opposite is true – the solid is more dense than and sinks in the liquid.

Water is so unusual that some early chemists even considered it as a proof of the existence of a god. Here’s JL Comstock, writing in his 1845 book Elements of Chemistry:

The effects of temperature upon liquid water is distinguished by a peculiarity of a very striking kind, and exhibits a departure from the general laws of nature, for a purpose so wise and beneficient, as to afford one of the strongest and most impressive of those endless proofs of design and onniscience in the frame of creation, which it is the most exalted pleasure of the chemist, no less than of the naturalist, to trace and admire.

The New York Times article talks about the various explanations offered for why ice is slippery.

  1. Ice’s solid phase is less dense than its liquid, and a large amount of pressure can lower the melting point of ice.
  2. The friction of dragging something (like your shoes) across ice generates enough heat to melt the ice.
  3. Solid ice is coated with a very thin layer of liquid water, even at temperatures well below 0C (32F).

Of the three explanations for ice being slippery, the first one appears in the most books. Ironically enough, it appears to be the least significant effect – except at temperatures close to the freezing point. We don’t put very much pressure on ice by walking on it. The real answer may lie in a cmbination of the second and third explanations – or somewhere else entirely.

It is, after all, a slippery subject.

Also interesting is that there is more than one kind of ice:

At higher pressures, the usual hexagonal structure breaks down, and the bonds rearrange themselves in more compact, denser crystal structures, neatly labeled with Roman numerals: Ice II, Ice III, Ice IV and so on. Scientists have also discovered several forms of ice in which the water molecules are arranged randomly, as in glass.

(What, no ice nine?)

These other arrangements of water molecules are more dense than the form of water ice that we observe in our freezers. That’s interesting too, but one ice researcher points out that these many different forms of ice can help us better inderstand how water molecules interact with other substances. This is pretty important for creatures like us, who are made of mostly water!

Freshman chemistry takes on homeopathy

Tuesday, February 21st, 2006

Homeopathy is an old form of “alternative” medicine that just doesn’t want to fade back into obscurity. One of the admittedly strange central ideas behind homeopathy is the idea that the more dilute a substance, the more potent it is. One homeopathy web site ( here ) explains it this way.

Key to the philosophy is the serial dilution of the remedies that get STRONGER “Biologically” as they get more dilute, or WEAKER from a “chemical” standpoint.

The problem with this line of thinking should be pretty obvious to anyone with some training in either biology or biochemistry – biology is, at the small scale, chemistry.

On the other hand, since many of the actve ingredients in homeopathic remedies are poisonous, perhaps making them weaker is no bad thing!

Homeopathic remedies are made by a process called serial dilution – which actually is a perfectly legitimate thing to do in a chemistry lab, as any student of analytical chemistry would be able to tell you. A serial dilution is just what it sounds like – repeated dilutions. Make a solution, then take a small portion of it and dilute it with water. Take a small portion of the new solution and dilute it with more water, and so on. The homeopaths add an extra step between each dilution, a kind of ritual shaking which they call succussion. The website referenced above tell us that this extra step

somehow energizes the remedy and adds “Necessary Energy” to the solution. Experiments have been done with hard physical measurements that have proven that the chemical bonds between the molecules actually get stronger.

Since they don’t say what kind of measurements have been made and where these results have been published, I’m not even going to attempt to evaulate this claim except to say that it’s unlikely based on what I know about the nature of chemical bonds. But even if there’s a small grain of truth in their claims, the homeopaths have another problem: there is a finite number of molecules in a solution. If you dilute a solution too much, you will eventually reach a point where a given volume of the solution is not likely to contain any molecules of the substance you are trying to dilute. Figuring this out should be simple enough for any student with a semester of freshman chemistry under their belt, and it’s an assignment I have given my freshman chemistry classes.

When I first made the assignment, I chose sulfuric acid as the substance to be diluted, mainly because it is a relatively simple molecule whose physical properties (like density) are easy to find. After doing a little more research, I find that sulfuric acid actually is used as a homeopathic remedy – going by the more impressive sounding name Sulphuricum Acidum. The homeopaths don’t seem to be in 100% agreement over the usage of sulfuric acid solutions, but they use it for treating weakness, trembling, skin discoloration, yellow stool, perspiration (after eating warm food), etc. (See here). Homeopathic sulfuric acid soltuions are available in a wide variety of dilutions, and it’s at this point that we need to define the system that homeopaths use to describe “potency” (in homeopathic language, that’s how dilute a solution is).

The system basically tells how many dilution steps were used, then follows it with a Roman numeral indicating the factor the solution was diluted by. For example, a 1X dilution contains one part (I’ll assume a volume here) of substance in ten parts of solution. The “1” indicates that only one dilution step was performed, while the “X” indicates that it’s a 1 in 10 solution. A 1L dilution contains 1 part of substance in 50 parts of solution. A 1C dilution contains 1 part of substance in 100 parts of solution … and so on.

If the number in front of the Roman numeral is bigger than 1, a serial dilution was performed. A 2X solution, for example, would take two steps to make: First prepare the 1X solution, then take one part of that solution and make another solution containing one part of “1X” solution per ten parts. With an “X” solution, each successive dilution decreases the concentration by a factor of ten. For a “C” solution, each successive dilution decreases the concentration by a factor of 100 … and so on.

Here’s where freshman chemistry comes in. Using calculations that any freshman chemistry student should be able to perform, it’s possible to calculate the approximate number of molecules contained in each solution after each dilution. Here’s how it’s done.

First, we assume that the first dilution is made from pure sulfuric acid in water. This may or may not be the starting point for the homeopathic preparations (they don’t say), but this would givw the largest number of molecules of sulfuric acid that the solutions could possibly have. If the homeopaths start from a solution of sulfuric acid instead of the pure subtance, their preparations will contain fewer molecules that we will calculate here.

Next, we’ll need the density of pure sulfuric acid, about 1.85 grams per milliliter at room temperature. We need this to figure out the mass (and later, the number of molecules) of sulfuric acid in the first solution. From a supplier of homeopathic remedies ( here ), we find that sulfuric acid is available in many concentrations. A few of them are 6C, 12C, 24C, and 30C. Our goal is to find out how much sulfuric acid is actually present in these solutions. The largest bottle available from this supplier is 50 mL, so we will do our calculation of the number of molecules based on this volume.

(If you’re not interested in the math, feel free to skip down a bit to the table.)

The simplest way to figure out the number of molecules in a bottle is to first change the “C” notation into a unit that actually relates simply to the number of molecules. In preparing the first dilution (1C), we would dissolve 1 mL of pure sulfuric acid into enough water to make 100 mL of solution. How much sulfuric acid, in terms of molecules, is that?

Since individual molecules are so small, chemical calculations are based on moles of molecules. A mole is simply a large number of molecules, 6.02 times 1023 ( 6.02×10²³) of them. (This is no different than egg suppliers selling eggs by the dozen, or fireworks manufacturers selling firecrackers by the gross.) We will calculate the number of moles of sulfuric acid molecules in the 1C solution.

It is known that 98.09 grams of sulfuric acid contains one mole of sulfuric acid molecules (this is the called the molecular weight of sulfuric acid). We also know the density of the sulfuric acid, so we can calculate the number of moles of sulfuric acid in a milliliter.

So, the 1C solution will contain 0.01886 moles of sulfuric acid in every 100 mL. Chemists routinely describe the concentration of solution in terms of molarity (abbreviated as M) – which is simply the number of moles of substance dissolved in a liter of solution. We have prepared 100 mL (0.100 L) of 1C solution, so the concentration is

If the concentration of the 1C solution is 0.1886 M, then each liter of the solution would contain 1.13 times 1023 molecules (which sounds like a really large number, right? We’ll compare it to plain vinegar later). 50 mL (0.050 L) of the solution – the biggest bottle of homeopathic sulfuric acid available from our supplier – would contain 5.68 times 1021 molecules. This still seems like a really large number, but remember that molecules are really small.

Each serial dilution requires one mL of the previous solution to be diluted to 100 mL. That means that each dilution will contain 1/100th of the number of molecules of sulfuric acid as the solution before it. Here’s a table of some dilutions of sulfuric acid and the number of molecules that a 50 mL bottle of each would (on average) contain.

Dilution Number of molecules in 50 mL
1C 5.68 times 1021
2C 5.68 times 1019
6C 5.68 times 1011
11C 56.8
12C 0.568
24C 5.68 times 10-23
30C 5.68 times 10-37

To put this in perspective, even the most concentrated (1C) dilution of sulfuric acid contains only about half the acid that the same amount of plain vinegar does (and that’s including the fact that sulfuric acid itself has two acidic protons while the acetic acid in vinegar only has one). So the 6C dilution is about 1/20,000,000,000th the strength of plain vinegar.

Another way to look at the numbers is to think about how many bottles of remedy you would have to buy to get a single molecule of sulfuric acid, For the 6C dilution, that’s not a problem – but for the 12C, 24C, and 30C solutions it is! If each bottle of 12C contains on average half a molecule of sulfuric acid, then you’d need to buy two bottles of remedy to be reasonably sure of getting a single molecule of active ingredient. That might not be too expensive, but you’d need about 2 times 1024 bottles of the 24C, and 2 times 1036 bottles of 30C. (Better open your wallet!)

Some homeopaths are at least a little honest about the fact that most of these bottles they sell contain nothing but water and perhaps some alcohol. Here’s what one web site ( here ) has to say on the matter.

Higher potencies of homeopathic remedies (anything higher than 12C) have been diluted past the point that molecules of the original substance would be measurable in the solution.

It’s not that the substanes aren’t detectable, it’s that quite likely a bottle will simply contain no molecules of the substance. Getting a molecule of the remedy, for the higher dilutions, would be like winning the Powerball. Occasionally, somebody wins – but how many people buy Powerball tickets and get nothing?

This is a major stumbling block for skeptics when it comes to understanding and accepting the idea of homeopathy.

Skeptics being defned as the set people who can do solution calculations?

Homeopathic remedies, when correctly chosen, clearly work—but not in the way that drugs do (through chemical actions that affect the body processes).

Or is it more likely that the most “potent” of the homeopathic medicines do not do anything at all and any “healing” that patients see is a result of the body’s ability to heal itself? Maybe some of this healing is simply the power of persuasion – people are told by a respected authority that thry’ll feel better, so they do.

If I bruise my arm, for instance, I could (if I weren’t very bright) decide that drinking one drop of toilet bowl cleaner dissolved in an eight ounce glass of water each day would make the bruise heal. If I did this, the toilet bowl cleaner probably wouldn’t do me any serious harm, and the bruise would heal in a matter of days. Can I claim that my “homeopathic toiletum bowlium cleanerum remedy” helped my arm to heal?

It is not completely understood why potentized remedies can work so deeply and specifically, but many likely theories have arisen through research and observation. It appears that they function on an energetic level to stimulate the body to heal itself more efficiently.

It is by no means proven that these remedies work at all, but look at the mechanism that is proposed: these remedies, many of which contain nothing at all, “function on an energetic level to stimulate the body”.

We have a name for things like that: the placebo effect.